Today, I want to share a CodeIgniter 4 website generator that’s been transforming how I approach new projects. The project is live at thephpcode.com
What Makes This Different?
Unlike traditional website builders that lock you into their platform, this generator creates actual CodeIgniter 4 code that you own completely. It combines a modern admin interfacewith a powerful module system that generates clean, PSR-4 compliant PHP code.
Think of it as scaffolding on steroids—you define your data structures, views, and actions through an intuitive interface, and it generates production-ready controllers, models, views, and migrations.
The Module System: Your Building Blocks
At the heart of the generator is a flexible module system. Each module represents a distinct feature of your application—a blog, an e-commerce catalog, a user directory, or anything else you can imagine.
Here’s how it works:
- Define your tables with fields (text, email, select, textarea, file uploads, etc.)
- Create views that display or collect data (Display views, Forms, or editable Grids)
- Configure actions that handle the logic (CREATE, READ, UPDATE, DELETE, SEARCH, REPORT, GRID)
What’s powerful is that relationships between modules are first-class citizens. Define a OneToMany relationship between Posts and Comments, and the generator creates proper foreign keys, model relationships, and even lets you embed comment forms directly on post detail pages.
AI-Powered Module Generation
Here’s where it gets interesting. Instead of manually creating every field and view, you can describe what you want in plain English:
“Create a blog module with posts that have a title, content, featured image, and publication date. Posts should have comments from users.”
The AI analyzes your request and generates the entire module structure—tables, fields, views, actions, and relationships. You can then tweak the generated structure in the visual editor before publishing.
The same AI capability extends to home page generation. Describe your landing page vision, and it creates a complete layout with sections, content, and styling ready to customize.
Beautiful Themes Out of the Box
Nobody wants their generated site to look like it’s from 2005. The generator includes four professionally designed themes:
- Default: Clean indigo and purple design with modern card layouts
- Modern Blue: Gradient-heavy with glassmorphism effects and smooth animations
- Minimal Dark: High-contrast dark theme (#111827) with purple accents
- Creative Gradient: Playful pink, purple, and orange gradients with animated elements
All themes are built on Bootstrap 5, so they’re responsive and accessible. Switch themes with one click, republish, and your entire site updates. You can also create custom themes by adding CSS files to the theme directory.
Template Modules: Don’t Reinvent the Wheel
Every application needs authentication, right? Instead of building login/register/logout flows for the hundredth time, the generator includes template modules you can clone into any website. The Auth module comes pre-configured with:
- User registration with validation
- Login with session management
- OAuth integration (Google, Facebook)
- Password reset flows
- Email verification
Just clone the template module, customize the views if needed, and you’re done.
Permission-Based Actions: Security Built In
Each action in your modules can be configured with access control:
- All: Public access
- LoggedIn: Requires authentication
- Role-based: Specific roles only
The generator creates the necessary middleware checks in your controllers, and you can manage roles and permissions through the built-in admin interface. No need to manually add if (!logged_in()) checks everywhere.
REST-ful Route Generation
Every action you create generates a clean route:
- /blog/posts → List all posts (REPORT action, GET)
- /blog/posts/123 → View single post (READ action, GET)
- /blog/posts/create → Create form (CREATE action, GET + POST)
- /blog/posts/123/edit → Edit form (UPDATE action, GET + POST)
- /blog/posts/123/delete → Delete record (DELETE action, POST)
The generator follows RESTful conventions, making your APIs predictable and easy to consume. You can even generate standalone API endpoints if you need a backend for mobile apps or SPAs.
Embeddable Views: Component Reusability
Want to show recent comments on your post detail page? Or embed a “Create Comment” form below each post? Embeddable views make this trivial. Mark any view as embeddable, configure display limits and sorting, and drag it into other views using the FormBuilder. The generator handles:
- Foreign key relationships
- Parent-child context (forms know which post they belong to)
- Validation error display
- Success/error redirects back to the parent view
- No manual wiring required.
Your generated modules still use CodeIgniter’s ORM and validation, so you get the best of both worlds.
The Generated Code is Yours
This is crucial: the generator creates real CodeIgniter 4 code in your /writable/websites/{id}/ directory. You can:
- Edit generated controllers and views directly
- Add custom business logic
- Version control everything
- Deploy to any PHP hosting
There’s no vendor lock-in, no runtime dependencies on the generator. Once code is generated, it’s just a standard CodeIgniter 4 application.
Who Is This For?
This tool shines when you need to:
- Build MVPs quickly without sacrificing code quality
- Create admin panels and internal tools
- Prototype database-driven applications
- Generate boilerplate for CodeIgniter 4 projects
- Teach CodeIgniter 4 patterns (the generated code follows best practices)
What’s Next?
The roadmap includes some exciting features:
- Drag-and-drop home page builder (reusing the FormBuilder UI)
- SEO meta tags for actions (title, description, Open Graph)
- Downloadable website packages
- Full REST API generation mode
- Enhanced file upload field types
Try It Yourself
The generatoruses a modern tech stack: CodeIgniter 4, ReactJS, Inertia, TypeScript, PostgreSQL, and TailwindCSS for the admin interface. If you’re tired of building the same CRUD interfaces over and over, or you want to ship projects faster without compromising on code quality, give it a try. The learning curve is gentle, but the productivity gains are substantial.
Have you built similar code generation tools? What features would make this more useful for your workflow? Let me know in the comments below.
]]>Step 1: Create a CI4 Project or use existing one
First we will create a brand new CodeIgniter 4 project. You can skip this step if you are setting up Inertia on existing project.
# If you need to create a new project
composer create-project codeigniter4/appstarter ci-inertia
cd ci-inertia

# If using existing project, just navigate to it
cd your-existing-project
Step 2: As second step we will inInstall the frontend and backend dependancies
# Frontend dependencies
npm init -y
npm install react react-dom @inertiajs/react @inertiajs/inertia @vitejs/plugin-react
npm install --save-dev vite laravel-vite-plugin
Step 3: Create a CI4 Inertia adapter
Create a library file at app/Libraries/Inertia.php with below code.
<?php

namespace App\Libraries;

use CodeIgniter\HTTP\ResponseInterface;

class Inertia
{
    protected $viewData = [];
    protected $sharedProps = [];
    protected $rootView = 'app';
    protected $version = null;

    /**
     * Set root template view
     */
    public function setRootView(string $view): self
    {
        $this->rootView = $view;
        return $this;
    }

    /**
     * Share data across all Inertia requests
     */
    public function share($key, $value = null): self
    {
        if (is_array($key)) {
            $this->sharedProps = array_merge($this->sharedProps, $key);
        } else {
            $this->sharedProps[$key] = $value;
        }
        return $this;
    }

    /**
     * Set the asset version
     */
    public function version($version): self
    {
        $this->version = $version;
        return $this;
    }

    /**
     * Render an Inertia response
     */
    public function render(string $component, array $props = []): ResponseInterface
    {
        $response = service('response');
        $request = service('request');

        // Merge shared props with component props
        $props = array_merge($this->sharedProps, $props);

        // Prepare the Inertia payload
        $page = [
            'component' => $component,
            'props' => $props,
            'url' => current_url(),
            'version' => $this->version,
        ];

        // Check if this is an Inertia partial reload
        if ($request->hasHeader('X-Inertia') && $request->getHeaderLine('X-Inertia') === 'true') {
            return $response
                ->setJSON($page)
                ->setHeader('X-Inertia', 'true')
                ->setHeader('Vary', 'Accept')
                ->setStatusCode(200);
        }

        // Load the full page for regular requests
        return $response->setBody(view($this->rootView, [
            'page' => json_encode($page),
            'head' => '' // Ensure head property is always available
        ]));
    }
}
Step 4: Create the InertiaFilter
Create inertia filter name InertiaFilter.php in the path App / Filters dir with below code.
<?php

namespace App\Filters;

use CodeIgniter\Filters\FilterInterface;
use CodeIgniter\HTTP\RequestInterface;
use CodeIgniter\HTTP\ResponseInterface;

class InertiaFilter implements FilterInterface
{
    public function before(RequestInterface $request, $arguments = null)
    {
        // Share common data with all Inertia requests
        service('inertia')->share([
            'errors' => session()->getFlashdata('errors') ?? (object) [],
            'flash' => [
                'message' => session()->getFlashdata('message'),
            ],
            'appName' => 'PHP Code Generator ',
            'csrf_token' => csrf_hash(),
            'auth' => [
                'isLoggedIn' => isLoggedIn(),
                'user' => isLoggedIn() ? getUser() : null,
            ],
        ]);

        // Add version for asset versioning
        if (ENVIRONMENT === 'production') {
            $versionFile = FCPATH . 'build/version.txt';
            if (file_exists($versionFile)) {
                service('inertia')->version(trim(file_get_contents($versionFile)));
            } else {
                service('inertia')->version(date('YmdHis'));
            }
        }
    }

    public function after(RequestInterface $request, ResponseInterface $response, $arguments = null)
    {
        // You can process response here if needed
    }
}
Step 5: Create the base view template
Create a view file app/View/app.php
<?php
// app/Views/app.php
$manifestPath = FCPATH . 'build/manifest.json';
$jsFile = '';
$cssFiles = [];
$isDevelopment = true; // Set to false in production

// Only attempt to parse manifest if the file exists
if (file_exists($manifestPath)) {
    $manifest = json_decode(file_get_contents($manifestPath), true);

    // Find the entry point in the manifest (usually resources/js/app.jsx)
    $entryPoint = 'resources/js/app.jsx';

    if (isset($manifest[$entryPoint])) {
        // Get the generated JS file path
        $jsFile = base_url('build/' . $manifest[$entryPoint]['file']);
        $isDevelopment = false;

        // Extract CSS files if available
        if (isset($manifest[$entryPoint]['css']) && is_array($manifest[$entryPoint]['css'])) {
            foreach ($manifest[$entryPoint]['css'] as $cssFile) {
                $cssFiles[] = base_url('build/' . $cssFile);
            }
        }
    } else {
        // Fallback: look for any entry point
        foreach ($manifest as $key => $value) {
            if (isset($value['isEntry']) && $value['isEntry'] === true) {
                $jsFile = base_url('build/' . $value['file']);
                $isDevelopment = false;

                if (isset($value['css']) && is_array($value['css'])) {
                    foreach ($value['css'] as $cssFile) {
                        $cssFiles[] = base_url('build/' . $cssFile);
                    }
                }
                break;
            }
        }
    }
}

// If we still don't have a JS file, fall back to Vite dev server
if (empty($jsFile)) {
    $jsFile = 'http://localhost:5173/resources/js/app.jsx';
}
?>
<?php if ($isDevelopment): ?>
    <!-- React Refresh Runtime for development only -->
    <script type="module">
        try {
            import('http://localhost:5173/@react-refresh').then(({
                default: RefreshRuntime
            }) => {
                RefreshRuntime.injectIntoGlobalHook(window);
                window.$RefreshReg$ = () => {};
                window.$RefreshSig$ = () => (type) => type;
                window.__vite_plugin_react_preamble_installed__ = true;
            }).catch(e => console.error('React Refresh runtime import failed:', e));
        } catch (e) {
            console.error('React Refresh runtime setup failed:', e);
        }
    </script>
<?php endif; ?>
<!DOCTYPE html>
<html>

<head>
    <meta charset="utf-8">
    <meta name="viewport" content="width=device-width, initial-scale=1">
    <title>Inertia React App</title>

    <!-- CSS files from manifest -->
    <?php foreach ($cssFiles as $css): ?>
        <link rel="stylesheet" href="<?= $css ?>">
    <?php endforeach; ?>

    <!-- Inertia head -->
    <?= $page['head'] ?? '' ?>
</head>

<body>
    <!-- Inertia app div -->
    <div id="app" data-page='<?= $page ?>'></div>

    <?php if ($isDevelopment): ?>
        <!-- Vite dev server script -->
        <script type="module" src="http://localhost:5173/@vite/client"></script>
    <?php endif; ?>

    <!-- JS entry point -->
    <script type="module" src="<?= $jsFile ?>"></script>
</body>

</html>
Step 6: Create Vite service for CI4
Create a file app/Libraries/Vite.php
<?php

namespace App\Libraries;

class Vite
{
    protected $devServerIsRunning = false;
    protected $devServerUrl = 'http://localhost:5173';
    protected $manifestPath = FCPATH . 'build/manifest.json';
    protected $manifest = null;

    public function __construct()
    {
        // Check if dev server is running
        if (ENVIRONMENT === 'development') {
            $this->devServerIsRunning = $this->isDevServerRunning();
        }

        // Load manifest if not in dev mode or dev server is not running
        if (!$this->devServerIsRunning && file_exists($this->manifestPath)) {
            $this->manifest = json_decode(file_get_contents($this->manifestPath), true);
        }
    }

    /**
     * Check if Vite dev server is running
     */
    protected function isDevServerRunning(): bool
    {
        $ch = curl_init($this->devServerUrl);
        curl_setopt($ch, CURLOPT_NOBODY, true);
        curl_setopt($ch, CURLOPT_FOLLOWLOCATION, true);
        curl_setopt($ch, CURLOPT_TIMEOUT, 1);
        curl_exec($ch);
        $statusCode = curl_getinfo($ch, CURLINFO_HTTP_CODE);
        curl_close($ch);

        return $statusCode === 200;
    }

    /**
     * Get asset URL for production or development
     */
    public function asset(string $path, string $type = null): string
    {
        if ($this->devServerIsRunning) {
            return $this->devServerUrl . '/' . $path;
        }

        if (!$this->manifest || !isset($this->manifest[$path])) {
            return base_url('/build/' . $path);
        }

        $assetPath = $this->manifest[$path]['file'];
        return base_url('/build/' . $assetPath);
    }

    /**
     * Include the React refresh script in development
     */
    public function reactRefresh(): string
    {
        if (!$this->devServerIsRunning) {
            return '';
        }

        return '<script type="module" src="' . $this->devServerUrl . '/@vite/client"></script>';
    }

    /**
     * Generate all script tags for development or production
     */
    public function scripts(array $entries = ['resources/js/app.jsx']): string
    {
        $html = '';

        if ($this->devServerIsRunning) {
            $html .= $this->reactRefresh();
            foreach ($entries as $entry) {
                $html .= '<script type="module" src="' . $this->devServerUrl . '/' . $entry . '"></script>';
            }
        } else {
            foreach ($entries as $entry) {
                if (!$this->manifest || !isset($this->manifest[$entry])) {
                    continue;
                }
                $file = $this->manifest[$entry]['file'];
                $html .= '<script type="module" src="' . base_url('/build/' . $file) . '"></script>';

                // Include CSS if there are imports
                if (isset($this->manifest[$entry]['css']) && is_array($this->manifest[$entry]['css'])) {
                    foreach ($this->manifest[$entry]['css'] as $css) {
                        $html .= '<link rel="stylesheet" href="' . base_url('/build/' . $css) . '">';
                    }
                }
            }
        }

        return $html;
    }

    /**
     * Generate all style tags for development or production
     */
    public function styles(array $entries = ['resources/css/app.css']): string
    {
        $html = '';

        if ($this->devServerIsRunning) {
            foreach ($entries as $entry) {
                $html .= '<link rel="stylesheet" href="' . $this->devServerUrl . '/' . $entry . '">';
            }
        } else {
            foreach ($entries as $entry) {
                if (!$this->manifest || !isset($this->manifest[$entry])) {
                    continue;
                }
                $file = $this->manifest[$entry]['file'];
                $html .= '<link rel="stylesheet" href="' . base_url('/build/' . $file) . '">';
            }
        }

        return $html;
    }
}
Step 7: Register the services in the app
Update the Services config file at app/Config/Services.php and include the below two methods.
<?php

namespace Config;

use CodeIgniter\Config\BaseService;
use App\Libraries\Inertia;
use App\Libraries\Vite;

/**
 * Services Configuration file.
 *
 * Services are simply other classes/libraries that the system uses
 * to do its job. This is used by CodeIgniter to allow the core of the
 * framework to be swapped out easily without affecting the usage within
 * the rest of your application.
 *
 * This file holds any application-specific services, or service overrides
 * that you might need. An example has been included with the general
 * method format you should use for your service methods. For more examples,
 * see the core Services file at system/Config/Services.php.
 */
class Services extends BaseService
{


    public static function inertia(bool $getShared = true): Inertia
    {
        if ($getShared) {
            return static::getSharedInstance('inertia');
        }

        return new Inertia();
    }

    /**
     * Return the Vite instance
     */
    public static function vite(bool $getShared = true): Vite
    {
        if ($getShared) {
            return static::getSharedInstance('vite');
        }

        return new Vite();
    }
}
Step 8: Create a React application structure
Create a file at resources/js/app.jsx. This will be our root view for inertia based apps. So here we import all the jsx files from Pages directory or inside sub directory of the page directory.
import React from 'react';
import { createRoot } from 'react-dom/client';
import { createInertiaApp } from '@inertiajs/react';

createInertiaApp({
  resolve: (name) => {
    // Import all JSX files from Pages directory
    const pages = import.meta.glob('./Pages/**/*.jsx');

    // Try the direct path first (most common case)
    const exactPath = `./Pages/${name}.jsx`;
    if (pages[exactPath]) {
      return pages[exactPath]().then(module => module.default);
    }

    // If not found, try to find a matching page with any path structure
    const matchingPaths = Object.keys(pages).filter(path => {
      // Extract component name from path (removes directory structure and extension)
      const componentName = path.split('/').pop().replace(/\.jsx$/, '');
      return componentName === name;
    });

    if (matchingPaths.length > 0) {
      return pages[matchingPaths[0]]().then(module => module.default);
    }

    // Log available pages in development for debugging
    if (import.meta.env.DEV) {
      console.error(`Page "${name}" not found - available pages:`,
        Object.keys(pages).map(path => path.split('/').pop().replace(/\.jsx$/, '')));
    }

    throw new Error(`Page ${name} not found.`);
  },
  setup({ el, App, props }) {
    createRoot(el).render(<App {...props} />);
  },
});
Step 9: Create a sample React page component
For testing whether the code we will create two Pages and Link them and see how it works in the front end. First create a file name Home.jsx at app/resouces/js/Page/Home.jsx
import React from 'react';
import { Link } from '@inertiajs/react';

// React 19 component
export default function Home(props) {
  const welcome = props.greeting || 'Welcome to your Inertia.js + React 19 app';

  return (
    <div style={{
      maxWidth: '800px',
      margin: '0 auto',
      padding: '2rem',
      textAlign: 'center'
    }}>
      <h1 style={{color: '#4e73df'}}>{welcome}</h1>
      <p>This is your first Inertia.js page with CodeIgniter 4 and React 19.</p>

      <div style={{marginTop: '2rem'}}>
        <Link href="/test" style={{
          display: 'inline-block',
          padding: '0.5rem 1rem',
          backgroundColor: '#4c51bf',
          color: 'white',
          borderRadius: '0.25rem',
          textDecoration: 'none'
        }}>
          Go to Test Page
        </Link>
        <h1 className='blue-500'>Bigger Text</h1>
      </div>
    </div>
  );
}
Then create another test page Test.jsx at app/resources/js/Pages/Test.jsx
import React from 'react';
import { Link } from '@inertiajs/react';

export default function Test(props) {
  return (
    <div style={{
      maxWidth: '800px',
      margin: '0 auto',
      padding: '2rem',
      textAlign: 'center'
    }}>
      <h1 style={{color: '#4c51bf'}}>{props.title || 'Test Page'}</h1>
      <p>{props.message || 'This is a test page to demonstrate Inertia.js with CodeIgniter 4.'}</p>

      <div style={{marginTop: '2rem'}}>
        <Link href="/" style={{
          display: 'inline-block',
          padding: '0.5rem 1rem',
          backgroundColor: '#4e73df',
          color: 'white',
          borderRadius: '0.25rem',
          textDecoration: 'none'
        }}>
          Back to Home
        </Link>
      </div>
    </div>
  );
}
Step 10: Create a basic CSS file
Create a basic file at resources/css/app.css
body {
  font-family: -apple-system, BlinkMacSystemFont, "Segoe UI", Roboto, Helvetica, Arial, sans-serif;
  line-height: 1.6;
  color: #333;
  margin: 0;
  padding: 0;
}

.container {
  max-width: 1200px;
  margin: 0 auto;
  padding: 2rem;
}

h1 {
  color: #3498db;
}
Step 11: Set up Vite configuration
Create a file vite.config.js at root
import { defineConfig } from 'vite';
import react from '@vitejs/plugin-react';
import laravel from 'laravel-vite-plugin';
import path from 'path';

export default defineConfig({
  plugins: [
    laravel({
      input: ['resources/js/app.jsx', 'resources/css/app.css'],
      refresh: true,
    }),
    react(),
  ],
  resolve: {
    alias: {
      '@': path.resolve(__dirname, './resources/js'),
    },
  },
  build: {
    outDir: 'public/build',
    manifest: true,
    rollupOptions: {
      input: {
        app: 'resources/js/app.jsx',
      },
    },
  },
  server: {
    cors: true,
    strictPort: true,
    port: 5173,
    hmr: {
      host: 'localhost',
    },
  },
});
Step 12: Update package.json with scripts
Update scripts block under the package.json file with sutiable scripts to run the application. We have defined dev, build and preview scripts as shown below.
{
  "name": "ci4-react-app",
  "private": true,
  "version": "1.0.0",
  "type": "module",
  "scripts": {
    "dev": "vite",
    "build": "vite build",
    "preview": "vite preview"
  },
  "dependencies": {
    "@inertiajs/inertia": "^0.11.1",
    "@inertiajs/react": "^1.0.0",
    "react": "^18.2.0",
    "react-dom": "^18.2.0"
  },
  "devDependencies": {
    "@vitejs/plugin-react": "^4.0.0",
    "laravel-vite-plugin": "^0.7.4",
    "vite": "^4.3.2"
  }
}
Step 13: Create a sample controller
We will create a Home controller for loading the test pages we have created in above step. So create a file named Home.php at path app/Controllers/Home.php
<?php

namespace App\Controllers;

use App\Controllers\BaseController;

class Home extends BaseController
{
    public function index()
    {
        return service('inertia')->render('Home', [
            'title' => 'Home Page',
            'greeting' => 'Hello from CodeIgniter 4 + React!'
        ]);
    }

    public function test()
    {
        return service('inertia')->render('Test', [
            'title' => 'Inertia Test Page',
            'message' => 'This page demonstrates how Inertia.js works with CodeIgniter 4.'
        ]);
    }
}
Step 14: Update routes maps the end points to the newly created controller methods.
Update routes.php file app/Config/Routes.php
<?php

use CodeIgniter\Router\RouteCollection;

/**
 * @var RouteCollection $routes
 */

$routes->get('/', 'Home::index');
$routes->get('/test', 'Home::test');
Step 15: Create a base filter for handling Inertia requests
Update the app/Config/Filters.php class to make inertia filter calls readable
<?php

namespace Config;

use CodeIgniter\Config\Filters as BaseFilters;
use CodeIgniter\Filters\Cors;
use CodeIgniter\Filters\CSRF;
use CodeIgniter\Filters\DebugToolbar;
use CodeIgniter\Filters\ForceHTTPS;
use CodeIgniter\Filters\Honeypot;
use CodeIgniter\Filters\InvalidChars;
use CodeIgniter\Filters\PageCache;
use CodeIgniter\Filters\PerformanceMetrics;
use CodeIgniter\Filters\SecureHeaders;
use App\Filters\InertiaFilter;

class Filters extends BaseFilters
{
    /**
     * Configures aliases for Filter classes to
     * make reading things nicer and simpler.
     *
     * @var array<string, class-string|list<class-string>>
     *
     * [filter_name => classname]
     * or [filter_name => [classname1, classname2, ...]]
     */
    public array $aliases = [
        'csrf'          => CSRF::class,
        'toolbar'       => DebugToolbar::class,
        'honeypot'      => Honeypot::class,
        'invalidchars'  => InvalidChars::class,
        'secureheaders' => SecureHeaders::class,
        'cors'          => Cors::class,
        'forcehttps'    => ForceHTTPS::class,
        'pagecache'     => PageCache::class,
        'performance'   => PerformanceMetrics::class,
        'inertia'       => InertiaFilter::class,
    ];

    /**
     * List of special required filters.
     *
     * The filters listed here are special. They are applied before and after
     * other kinds of filters, and always applied even if a route does not exist.
     *
     * Filters set by default provide framework functionality. If removed,
     * those functions will no longer work.
     *
     * @see https://codeigniter.com/user_guide/incoming/filters.html#provided-filters
     *
     * @var array{before: list<string>, after: list<string>}
     */
    public array $required = [
        'before' => [
            'forcehttps', // Force Global Secure Requests
            'pagecache',  // Web Page Caching
            'inertia', // Add the Inertia filter globally

        ],
        'after' => [
            'pagecache',   // Web Page Caching
            'performance', // Performance Metrics
            'toolbar',     // Debug Toolbar
        ],
    ];

    /**
     * List of filter aliases that are always
     * applied before and after every request.
     *
     * @var array<string, array<string, array<string, string>>>|array<string, list<string>>
     */
    public array $globals = [
        'before' => [
            // 'honeypot',
            // 'csrf',
            // 'invalidchars',
        ],
        'after' => [
            // 'honeypot',
            // 'secureheaders',
        ],
    ];

    /**
     * List of filter aliases that works on a
     * particular HTTP method (GET, POST, etc.).
     *
     * Example:
     * 'POST' => ['foo', 'bar']
     *
     * If you use this, you should disable auto-routing because auto-routing
     * permits any HTTP method to access a controller. Accessing the controller
     * with a method you don't expect could bypass the filter.
     *
     * @var array<string, list<string>>
     */
    public array $methods = [];

    /**
     * List of filter aliases that should run on any
     * before or after URI patterns.
     *
     * Example:
     * 'isLoggedIn' => ['before' => ['account/*', 'profiles/*']]
     *
     * @var array<string, array<string, list<string>>>
     */
    public array $filters = [];
}
Run the application
Start the front end application by running the below script we have added to package.json in earlier step.
# Run development server with hot reload
npm run dev

# Run the php server
php spark serve
Additional Steps for Production
When deploying to production, you’ll need to build the React assets:
This will create optimized assets in the public/build directory, which your CodeIgniter application will serve.
How This Works
- When a request comes in, the InertiaFilter adds shared data
- The controller renders an Inertia response with component name and props
- For initial page loads, CI4 sends the full HTML document with the Inertia page data
- React hydrates the page on the client side
- Subsequent navigation uses Inertia.js to request only the data needed
- Hot module replacement is handled by Vite during development
Additional Components You Might Want to Add
- Layout Components: Create layout components in React for consistent UI
- API Controllers: Separate controllers for API endpoints
- Authentication: Implement authentication and share user data
- Form Handling: Use Inertia.js form helpers for easier form submissions
I had prepared this document while setting up my existing website to support React with inertia instead of using traditional api based front end. Retested this document by setting a new CodeIgniter 4 projecy and amended this guide to make sure this works for most of the scenario. Hoe ever if you encounter any issues please feel free to post as comments and I will try to answer soon as possible. Also remember ChatGPT can help as well with errors specific to Inertia or Vite configurations.
]]>As a first step you need to go to the config file and remove the index.php. If you have deployed the website to apache web server please make sure the mod_rewrite module is enabled. It is the case with most of the hosting providers.
In CodeIgniter 4
public $indexPage = '';
In CodeIgniter 3 and earlier versions
$config['index_page'] = 'index.php';
If you have deployed the website with nginx server the below step is required and your website should already work with above changes. If you have deployed in apache then create .htaccess file in the website root directory and add below contents to that.
RewriteEngine on
RewriteCond $1 !^(index.php|resources|robots.txt)
RewriteCond %{REQUEST_FILENAME} !-f
RewriteCond %{REQUEST_FILENAME} !-d
RewriteRule ^(.*)$ index.php/$1 [L,QSA]
Now test the website and it should be working without index.php file. If you are using nginx you can route all the traffic through the php fpm process so that the url without php extension also will be handled as expected. Below is sample server block for nginx to use without index.php in the URL. Please note the bolded section in the server block.
server{
    server_name     aboutfullstack.com;
    root            /opt/www/$server_name/;

    index index.html index.htm index.php;

    location / {
        try_files $uri $uri/ /index.php?$query_string;
    }

    location ~ \.php$ {
        fastcgi_pass unix:/var/run/php-fpm.socket;
        fastcgi_index index.php;
        fastcgi_param SCRIPT_FILENAME $realpath_root$fastcgi_script_name;
        include fastcgi_params;
    }
}
Hope this helped to implement the change. You can comment if you have any question related to this.
]]>You can follow the read me of how to use and what functionalities are available in it. Here is the detail documentation if you want to know more about the design and implementation details.
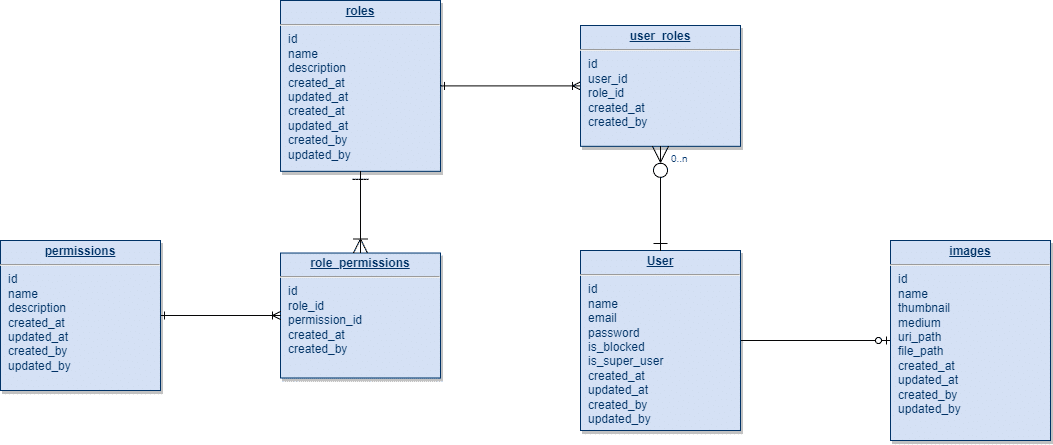
Data model design
First I came up with the data model considering that the admin should be able to configure the access for users without touching the code. Also it should be possible for users to have more than one role.
Features
The following features are supported by the modules. The current version is built for using by the API so uses JWT based authentication and the same can be easily extended to support cookie / session based authentication.
User Management
Users can register, login, verify email address and see the profile data about themselves. The following routes are available related to user management.
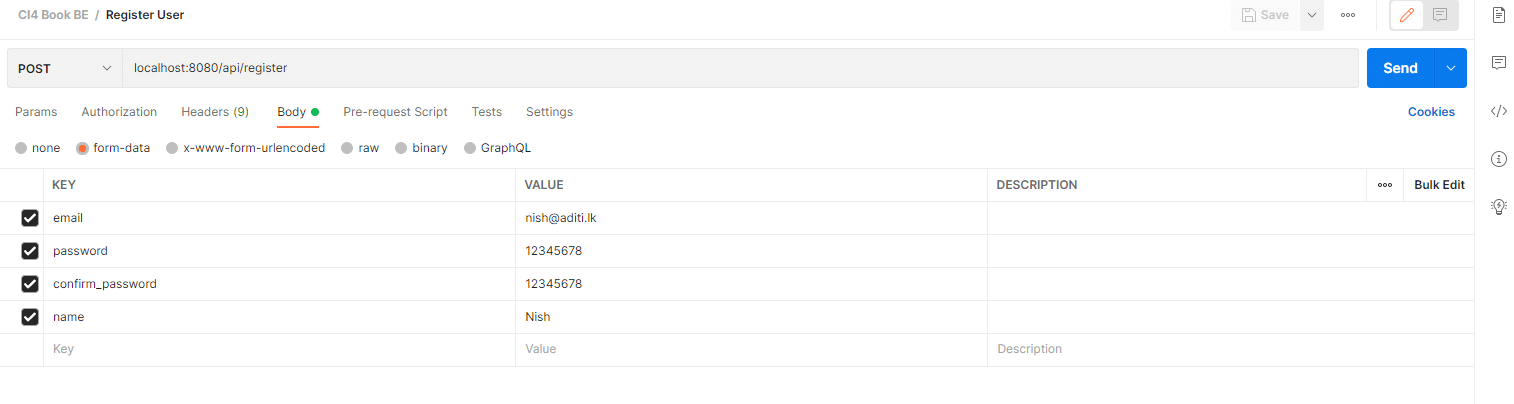
User registration
End point: /api/register
Example:
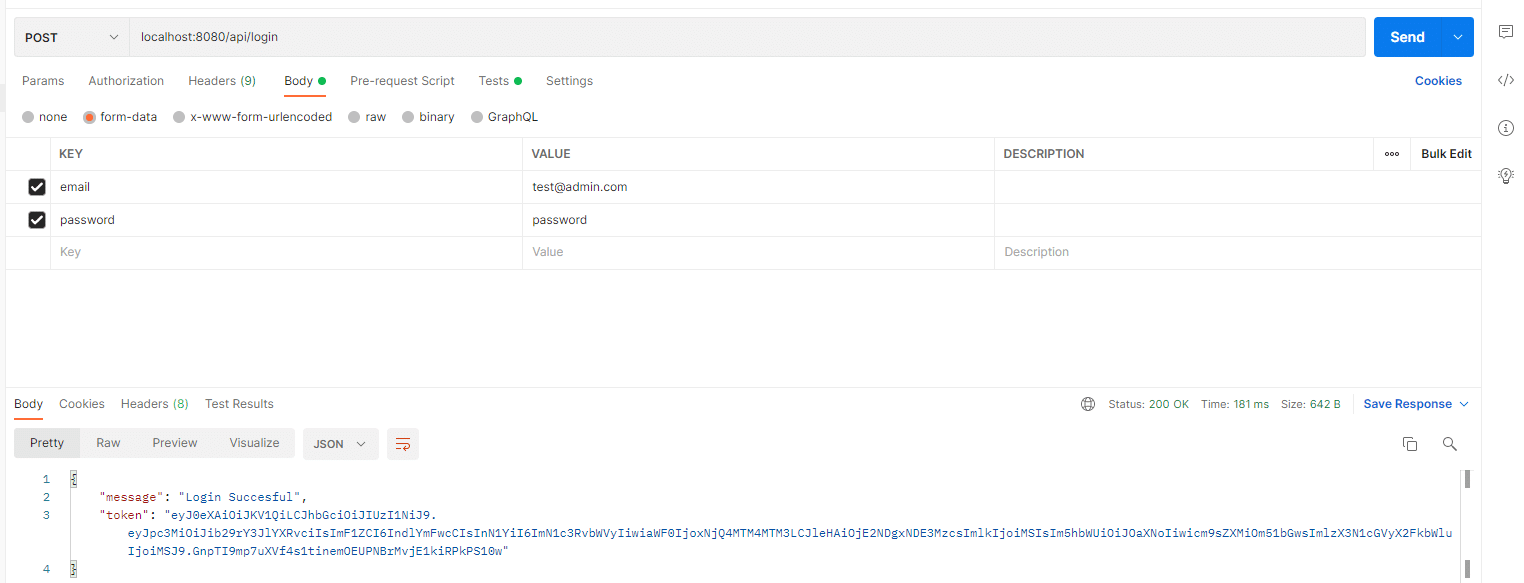
User login
End point: /api/login
Example:
User Profile
End point: /api/me
Example:

Notice in the above scenario the jwt token return in the logged in API call has been passed as bearer token.
Filters
There are two filters provided by the module. One is for throttling and the other one is for securing end points.
Throttling filter is used to protect the login end point from hacking by limiting number of login attempt possible within given time frame. Currently it is limited to 3 per minute and can be changed easily as per your requirement.
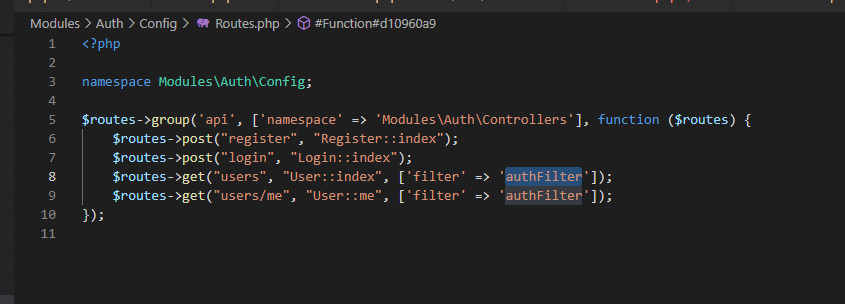
The “authFilter” can be used to protect routes/endpoint from unlogged in users. Below is an example setup where the authFilter is used.
Helpers
Helper functions are provided to further fine tune the access. Functions are available for checking whether logged in user has got given role or permission. It is useful to implement permission based functionalities within the controllers. The following helper functions are available.
- hasRole($role_name) – Checks whether the user got given role
- hasPermission($permission_name) – Checks whether the user got given permission
- isLoggedIn() – Return true/false based on whether user is logged in
- getUsername() – Returns the Name of the logged in User.
- getUserid() – Returns the id of the logged in user
- getUser() – Returns the user instance of the logged in user with all attributes
- loginUser(User $user) – Logs in the user. Used by the AuthFilter to set the User id to the request object after validating the JWT
For using this function first needs to load the helper then can call any of the function as shown below.
  helper('Modules\Auth\Auth');

    if (!hasPermission('manage_user')) {
        return $this->respond([
            'status' => 'fail',
            'message' => 'You don\'t have permission to access the data'
        ], 403);
    }
Further changes
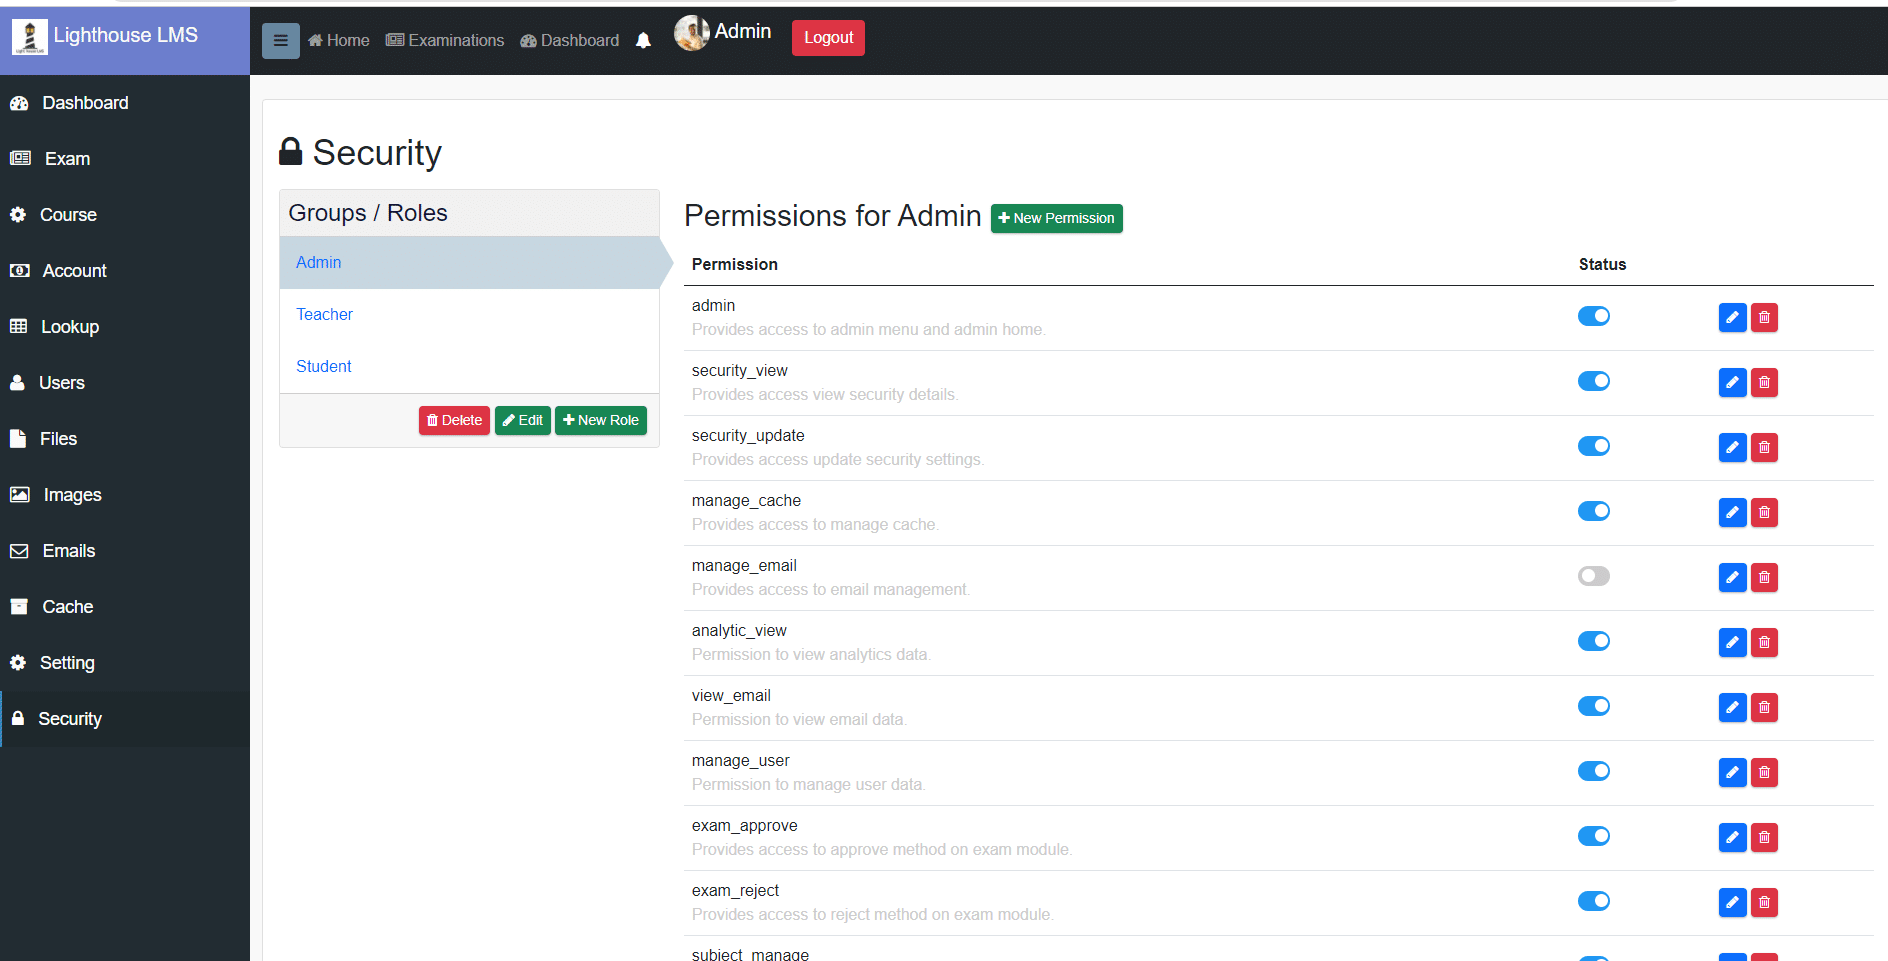
I am working on a Admin dashboard which provide portal for admins to manage users, configure roles, permissions and associate roles and permissions. Below are some screenshots from the portal. The portal is compatible with the above user auth module but not part of the open source project but you can contact me if you want to buy it for price of two coffee ($9).