
Recently I was upgrading my home servers from Raspberry Pi to a PC with high configuration (intel i7, 32GB RAM and 1TB SSD). On Raspberry Pi, I used a single node docker network, but with plenty of resources to spend I wanted to explore on multi node Docker Swarm setup. Nginx is a high performing load balancer and with low resource requirement suits well for Raspberry Pi like mini computers. But also require some static configurations compare to other modern cloud native load balancers. So this time I wanted to go with Traefik as load balancers as resource requirement is not strict so wanted to choose something provide more sophisticated solution for docker services.
Advantages of Traefik
- Automatic service discovery
It discovers new services in the docker swarm network using labels, and generate and maintenance SSL certificates for the services.
- Load balance with multi node swarm network
Support automatic load balancing on multi node docker cluster.
Setting up Traefik
Setting up Traefik was on a multi node docker swarm was not walk on the cake for starter like me in in Traefik and that is the reason I wanted to cover this in a tutorial. The configurations given in the Traefik website will be overwhelming. It is better to start minimum configuration and then add up to understand how everything work together.
Before doing anything you need to create a overlay network for connecting the service running in different nodes across the cluster on multi node docker cluster envirornment.
docker network create --driver=overlay lb-netIn the above command lb-net is the name for the network. You can choose any name but need to stick to the same network name in subsequent steps.
Create a yaml configuration compose file docker-compose.yml to run the Traefik service in your docker cluster. This is the minimum configuration required and we will update the same step by step instead of going to full configuration without understanding each step.
version: '3'
services:
    traefik:
        image: traefik:v2.10
        ports:
           - "80:80"
           - "8080:8080"
        command:
          - --api.insecure=true
          - --providers.docker.swarmMode=true
          - --providers.docker.exposedByDefault=false
          - --providers.docker.network=proxy
          - --entrypoints.web.address=:80
          - --accesslog
          - --log.level=info

        environment:
          - TZ=Europe/Berlin
        volumes:
          - /var/run/docker.sock:/var/run/docker.sock:ro
        networks:
          - lb-net
        deploy:
            mode: global
            labels:
              - traefik.enable=true
              - traefik.docker.network=lb-net
              - traefik.http.routers.mydashboard.rule=Host(`yourdomain.com`)
              - traefik.http.routers.mydashboard.service=api@internal
              - traefik.http.services.mydashboard.loadbalancer.server.port=1337
            placement:
                constraints:
                    - node.role == manager
networks:
    lb-net:
        external: true
In the above compose file you can see we are using the traefik:v2.10 image which is the latest stable version available as of now. Also passing some command configuration and some label configurations. The label configurations under deploy tag is used because in this we are exposing the traefik dashboard using domain name yourdomain.com. We can ignore the label section if we don’t expose the traefik dashboard. deploy mode is set as global which will allow traefik will expose the port 80 in all the nodes in docker cluster. So any traefik reaches at port 80 in any of the docker cluster node will be handled by the Traefik load balancer and routed to the appropriate docker service based on configurations.
We will see how to deploy another docker service in different stack to use the Traefik load balancer after going through some common mistakes.
Some common mistakes with Traefik configuration
Adding the labels directly on the top. This is one of the mistake I did by following some of the online examples were in that way. I assume older versions of Traefik might have supported the labels on the top but with given version the labels should under deploy tags.
Another mistake I made was having multiple deploy tags inside the compose file. This won’t show any error or warning while deploying the stack but the final one in the compose file will be effective, so if the labels are defined on the first occurring deploy tag and if there is another deploy tags the labels will be lost at run time.
Another configuration mistake most of us do is using docker mode instead of swarm mode in the command section of the above configuration. Both providers.docker.swarmMode=true and providers.docker = true are mutually exclusive and you need to choose one based on your deployment type. If you use swarm deployment you need to use swarmMode only in your configuration. No errors are shown even if you have defined both but it won’t work if both defined.
Another mistake is not defining the service port inside the label section of the service. Traefik needs to know to which port to redirect the service when the domain name configuration is matching. In the above example we have added the configuration as traefik.http.services.mydashboard.loadbalancer.server.port=1337 because the docker dashboard service runs on the port 1337, you can give the port number where your service is running. After the service use a unique service name for each docker service. Here we have used mydashboard.
Another mistake you could make it in the service name referring the service name given in docker compose for the service instead should refer the router name defined. For example in below configuration traefik service label should be istorestatic not istore.
services:
  istore:
    image: nginx:1.23.0
    deploy:
      replicas: 1
      labels:
        - traefik.enable=true
        - traefik.docker.network=lb-net
        - traefik.http.routers.istorestatic.rule=Host(`example.co.uk`)
        - traefik.http.routers.istorestatic.service=istorestatic
        - traefik.http.services.istorestatic.loadbalancer.server.port=80
        - traefik.http.routers.istorestatic.tls.certresolver=myresolver
    ports:
      - 8072:80
    volumes:
      - /host/docker/indianstore/data:/var/www
      - /host/docker/indianstore/conf/:/etc/nginx/conf.d
    networks:
      - lb-net
Deploying Traefik
For deploying the docker stack run below command refers the compose file created above named “docker-compose.yml”
docker stack deploy --compose-file docker-compose.yml traefikIn the above step traefik is the stack name for the deployment, also assumed you are inside the directory where the docker-compose.yml file is, otherwise you need to provide full path to the compose file.
After running the command access the domain name mentioned in the compose file in port 80 and you should view the traefik dashboard as shown below.
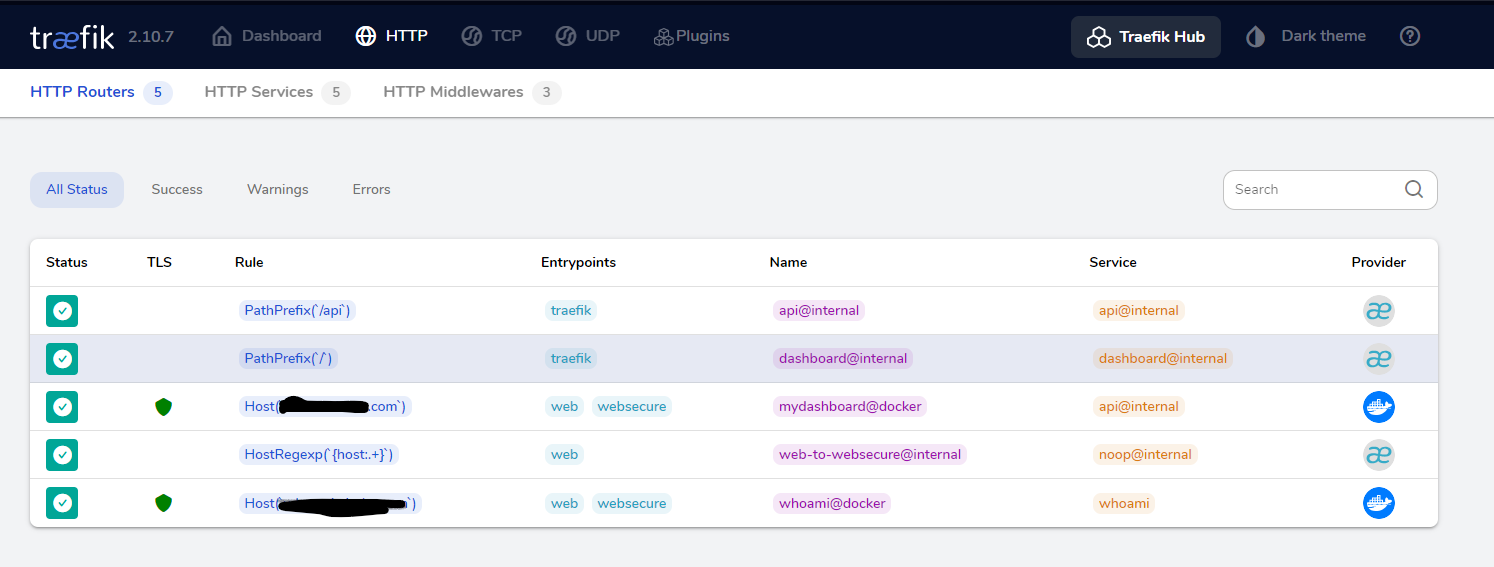
In the above dashboard you also see another service with docker provider named whoami, as the screenshot was taken after deploying the service. Below is the compose file for deploying the whoami service as an example on how to deploy additional docker services to work with the traefik load balancer.
services:

  whoami:
    image: "traefik/whoami"
    deploy:
       labels:
          - traefik.enable=true
          - traefik.docker.network=lb-net
          - traefik.http.routers.whoami.rule=Host(`whoami.mydomain.com`)
          - traefik.http.routers.whoami.service=whoami
          - traefik.http.services.whoami.loadbalancer.server.port=80

    networks:
      - lb-net

networks:
   lb-net:
      name: lb-net
      external: true
In the above example we have defined a new router whoami under labels under deploy tag for Traefik to understand the service configuration for this service. Also notice we use the external overlay network we created in earlier step. Also we let Traefik know to look for the service in that docker network and we also provide the port the service is running. If you have noticed in the Traefik service compose file we mapped the docker socket as the volume as ” – /var/run/docker.sock:/var/run/docker.sock:ro” this allows Traefik to know when there is new services deployed. Also we had a setting “providers.docker.exposedByDefault=false” to inform Traefik not to expose all services by default unless mentioned and the service level. That is the reason we have “traefik.enable=true” in the compose file for whoami to explicitly expose this service through Traefik load balancer.
If all of the above is in working condition with http connection, now you can follow below step to enable SSL (https) for this services.
SSL Configuration with Traefik
For using Letsencrypt free SSL certificates, we will create directory and a json file which will be used by Traefik to store the generated certificates.
mkdir data
mkdir data/certs
touch data/certs/acme.json
After that update the compose file created earlier with the bolded lines below, or simply copy this below code to override the previous version you used for Traefik deployment.
version: '3'
services:
    traefik:
        image: traefik:v2.10
        ports:
           - "80:80"
           - "443:443"
           - "8080:8080"
        command:
          - --api.insecure=true
          - --providers.docker.swarmMode=true
          - --providers.docker.exposedByDefault=false
          - --providers.docker.network=proxy
          - --entrypoints.web.address=:80
          - --entrypoints.web.http.redirections.entryPoint.to=websecure
          - --entrypoints.web.http.redirections.entryPoint.scheme=https
          - --entrypoints.websecure.address=:443
          - --accesslog
          - --log.level=info
          - --certificatesresolvers.myresolver.acme.tlschallenge=true
          - --certificatesresolvers.myresolver.acme.email=msnishanth@gmail.com
         - --certificatesresolvers.myresolver.acme.storage=/letsencrypt/acme.json

        environment:
          - TZ=Europe/Berlin
        volumes:
          - /var/run/docker.sock:/var/run/docker.sock:ro
          - ./data/certs:/letsencrypt
        networks:
          - lb-net
        deploy:
            mode: global
            labels:
              - traefik.enable=true
              - traefik.docker.network=lb-net
              - traefik.http.routers.mydashboard.rule=Host(`traefik.domain.com`)
              - traefik.http.routers.mydashboard.service=api@internal
              - traefik.http.services.mydashboard.loadbalancer.server.port=1337
              - traefik.http.routers.mydashboard.tls.certresolver=myresolver
            placement:
                constraints:
                    - node.role == manager
networks:
    lb-net:
        external: true
In above file we have added a new volume mapping to map the newly created cert directory and use it inside the labels to refer to the certificate storage file we created as
- --certificatesresolvers.myresolver.acme.storage=/letsencrypt/acme.jsonAlso we have created the certificate resolver named certificatesresolvers and we refer this one inside the deploy labels tag as
traefik.http.routers.mydashboard.tls.certresolver=myresolverAlso we have setup automatic redirection from http to https incase if you want browser to automatically redirect http endpoint to https endpoints for the services using below command
- --entrypoints.web.http.redirections.entryPoint.to=websecure
- --entrypoints.web.http.redirections.entryPoint.scheme=https
Now if you redploy the Traefik service and try to access the host name used (traefik.domain.com) it will redirect to https endpoint.
docker stack rm traefik
docker stack deploy --compose-file docker-compose.yml traefik
You can use above command to redeploy the Traefik stack. If something is not working you see the docker service logs to understand what is failing using below command.
docker service logs traefik_traefikIf the Traefik dashboard is working with https, you can also do the same for the whoami service we deployed earlier using below compose file.
services:
  whoami:
    image: "traefik/whoami"
    deploy:
       labels:
          - traefik.enable=true
          - traefik.docker.network=lb-net
          - traefik.http.routers.whoami.rule=Host(`whoami.domain.com`)
          - traefik.http.routers.whoami.service=whoami
          - traefik.http.services.whoami.loadbalancer.server.port=80
          - traefik.http.routers.whoami.tls.certresolver=myresolver
    networks:
      - lb-net

networks:
   lb-net:
      name: lb-net
      external: true
Hope above tutorial helped with your deployment. In case of any issues not mentioned here you are welcome with your questions in comments and I am happy to answer them.
Leave a Reply